I’m going to write a short series on Newly released Features hat make up the Zerto 9.5 release
Once I have experienced the new features a little more I will do a second series deep diving some of the new features and functionality inside Zerto 9.5
As a long time Zerto user I am going to show some of the features that may not be headline items but will make a difference to Zerto users everywhere!
Exclude Disk from Replication
Previously inside Zerto, there was a concept of a “temp” disk, this would only sync once and then not participate in CDP after the initial sync was complete, this was great however if your Temp disk was 2TB in size not only did the initial sync take extra time to complete but also took up storage space at the DR site. With Zerto 9.5 users now have the option to select one of three options for each disk attached to a VM being replicated by Zerto
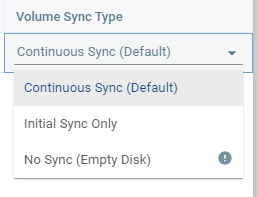
Continuous Sync (Default) – this will be the most popular options as it means all data on the disk will be continuously replicated
Initial Sync Only – Disks will only undergo an initial sync and then opt out of CDP after.
No Sync – this option is brand new and allows disks to be completely removed from all sync activities including initial sync.
The No Sync option will add flexibility and agility to people Zerto deployments and will no longer have initial sync times longer than necessary and no longer be storing data they never intend to use for DR or Ransomware Recovery. upon recovery an empty disk will be attached to the VM of the correct size.
Please look out for the next post in this series which will cover another new feature in Zerto 9.5
For the first time in Zerto’s history customers, partners and prospects are now able to gain valuable expertise and knowledge in the Zerto solution from a qualified instructor.
Managing Zerto: Setup,Protection, and Recovery is the title of the course which is aimed at all experience levels looking to solidify their zerto knowledge to makes sure they are using Zerto’s powerful solution to the best of its ability and solving for all use cases.
During the class there are labs that students will complete to solidify their conceptual knowledge they will have learned from the instructor and students can even show the value of Zerto by recovering from ransomware within minutes, to seconds before an attack.
Last week i had the pleasure of attending AWS Re-Invent in Vegas, I spoke to a lot of people and it reminded me of how much I have missed these type of events recently!
I had the pleasure of speaking to some of Zerto’s customers who are already achieving their DR or migration goals utilizing Zerto and AWS. So Logically the NExt question was – what’s next from Zerto? i spent most of my week talking about the new product announcement – Zerto In-Cloud for AWS – Disaster Recovery at Scale for EC2 instances!
Lets take a look at some of the key highlights before my next blog which will be a deeper dive.
Scalable DR – No agents to manage ! i think this is huge because everyone know as you scale managing agents across 1000 EC2 instances is no easy task
Purpose built for AWS – A complete re-design and new In-Cloud Appliance makes Zerto In-Cloud incredibly efficient and cost effective
Cross Region, Availability Zone and Account – Giving customers ultimate choice and flexibility in their DR – Not just pre-approved paired zones!
Configurable RPO – This is a first for Zerto allowing customer to choose the desired RPO on a VPG by VPG basis.
Advanced Analytics – From day 1 Zerto In-Cloud will show all analytical data in its SaaS platform Zerto Analytics for greater visibility and control over your entire hybrid/public cloud estate
That’s is all i can think of off the top of my head, i will be doing a follow up to this to go over some of the technical parts in more detail so keep an eye out for that one in the near future.
Feel free to get in touch if you would like to know more!
First of all I am going to apologise for the terrible title, I don’t know what came over me. In this blog i am going to run you through how Zerto can scale up and down with your environment to make sure Zerto is always right sized for the amount of workloads you are running.
Lets look at the architecture of Zerto to begin with.
We can see we have 2 major components the Zerto Virtual Manager (ZVM) and the Virtual Replication Appliance (VRA)
The ZVM is the management component of the Zerto Platform so is not in the data path – as long as this is sized sensible in the first instance with an external DB we shouldn’t need to scale this up at all
The VRA is the data mover, these are the appliances that sit on each and every hypervisor host in the environment, they are in the data path and these are the appliances that actually carry out the continuous data protection that Zerto is famous for.
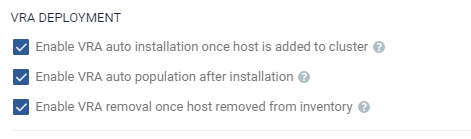
As mentioned earlier each Hypervisor host in the on premises environment has a VRA installed upon it so if your environment has 500 VM’s with 12 Hosts, therefore you have 12 VRA’s to support Zerto replication and Long Term Retention. Now imagine that you scale your environment to 1000 VM’s, you will need another 12 hosts to support those VM’s running and therefore Zerto will have another 12 VRA’s added to the environment , and as the title of the blog suggested, this can happen automatically when you add a host the a cluster – all you need to to is enable a couple of settings in your ZVM.
These settings allow Zerto to automatically deploy a VRA when a host is added to a cluster and also automatically remove the VRA when a host is removed from a cluster meaning that these setting will allow Zerto to automatically scale up AND down with your environment.
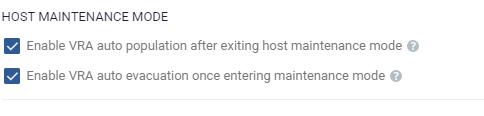
combine the above settings with these:
This now allows hosts to be added and removed without the need to manually move workloads or journal/replica disks and for the VRA to be automatically added and removed with.
When using auto evacuate and auto populate please note that this is not an instant process and can take a few minutes to complete – I’m the most impatient person so I found out the hard way that i just need to leave it and wait a few more moments.
Hey everyone just a quick post today about the new Zerto version that has been released recently, they’re is a couple of things I want to point out that I think are worth noting!
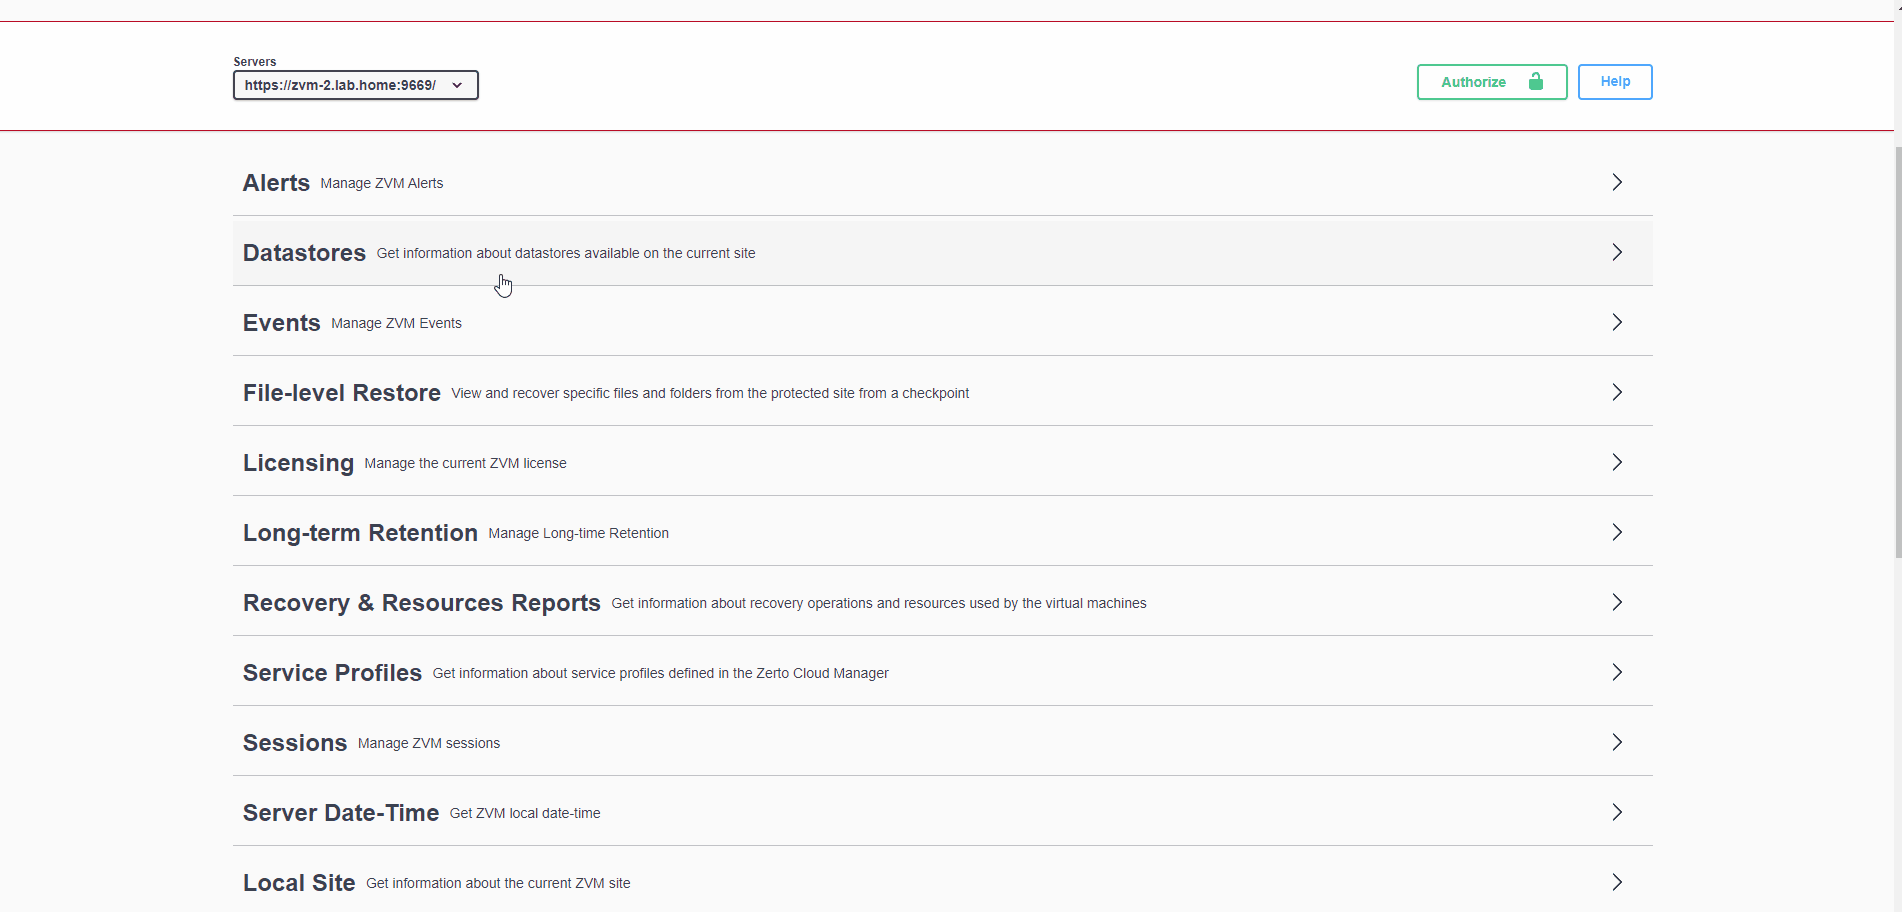
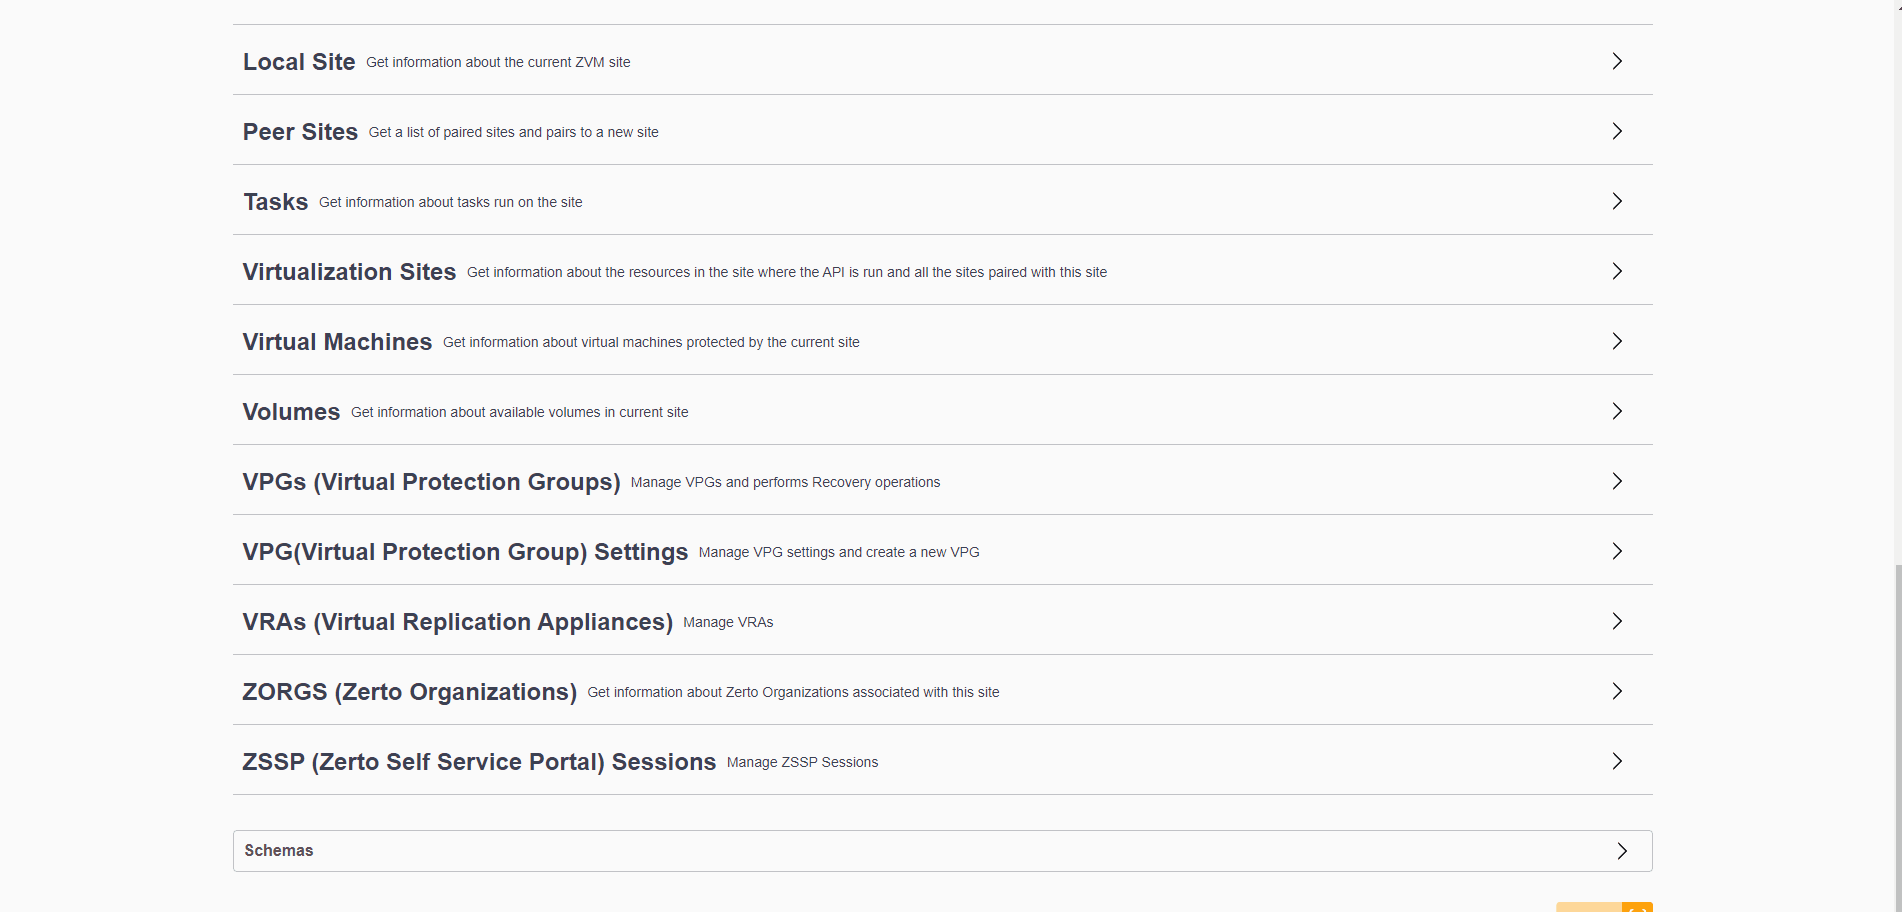
Swagger API for the ZVM
now anyone who loves a little bit of automation will love the API , i actually found the Zerto API one of the more friendly API’s to use however Zerto have just made it a tonne easier! adding a swagger API allows to API Commands to be run from the web to try them out adn too help with constructing their own api calls for automation purposes.
As you can see above the API covers everything that you would expect inside the ZVM.
i’ll show you how to authenticate first:
Now we will use the Auth token we created to run an API call
Lets run the Peer Sites API and see the response and information we get back from calling the API.
It’s incredibly easy to run and gain lot’s of valuable information from it.
MSP Improvements
As you all know MSP and multi-tenancy is where my zerto career started so is got a place firmly in my heart, in this release we have seen some improvements for our MSP community.
VMware Cloud Director (VCD) reflection collection improvement
The VCD reflection collection mechanism was optimized to enhance performance and prevent CPU and networking spikes in machines belonging to large-scale VCD environments. The VCD CPU and the internal DB load are reduced due to:
Limiting parallel calls to VCD
Actively monitoring the calls to VCD to achieve a much more efficient process
Optimizing ZVM queries to VCD
Hopefully these improvement can make Zerto more efficient in processing its data from VCD and make running at extreme scale easier.
I will be doing a follow up blog for some more API tasks that I think people may want to use
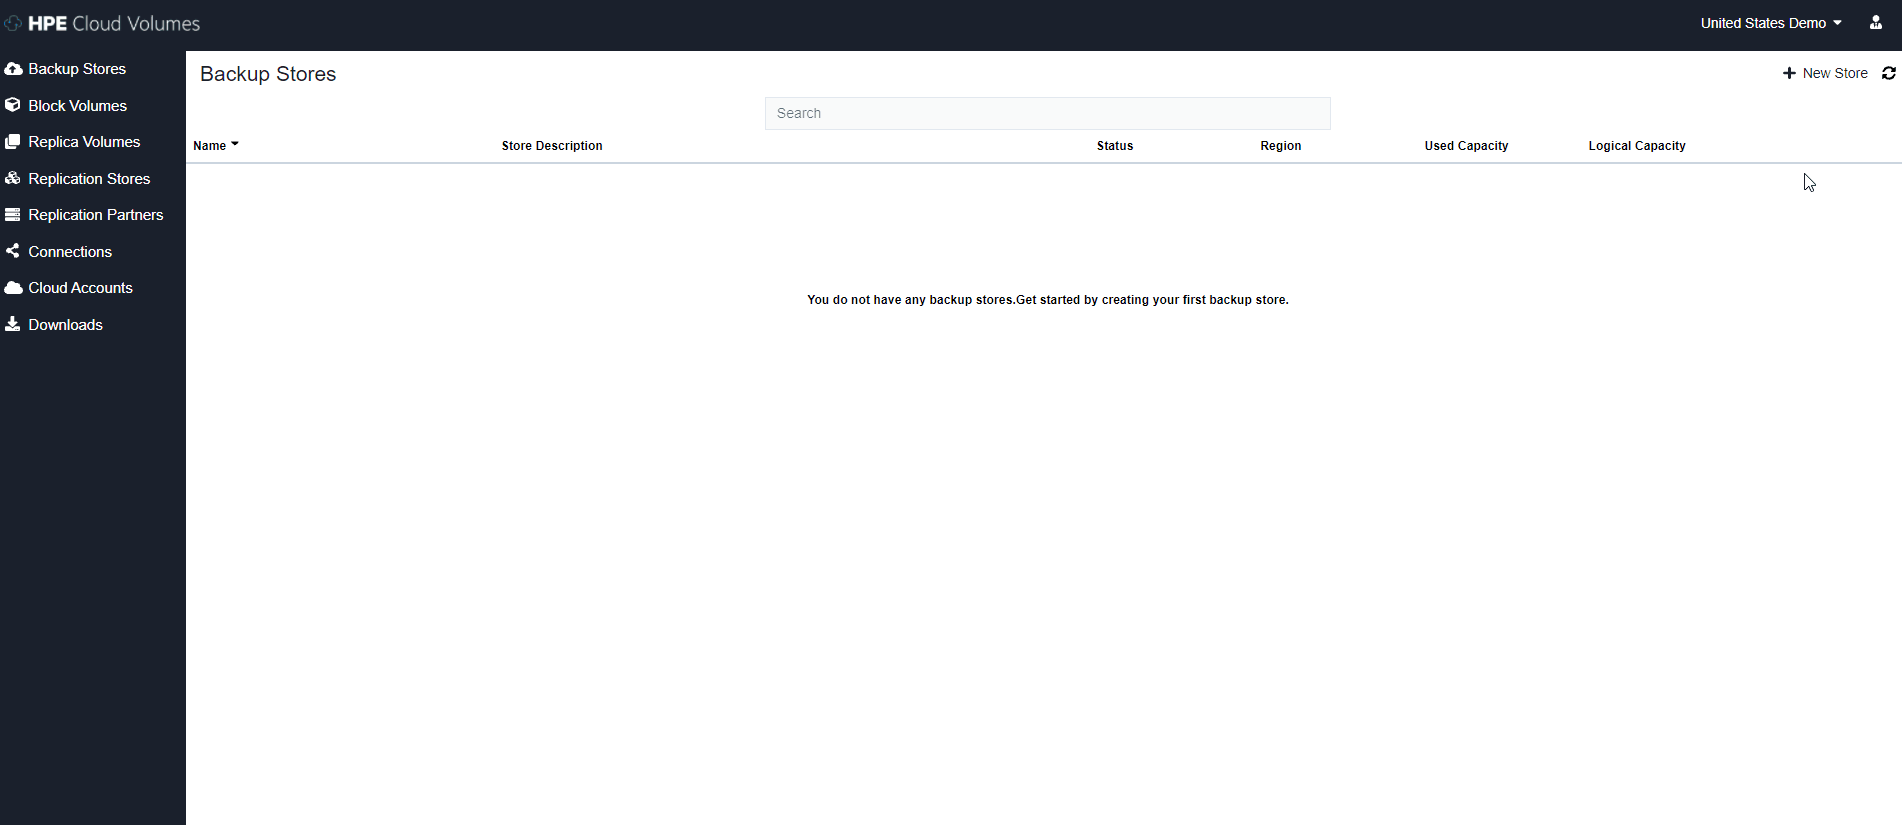
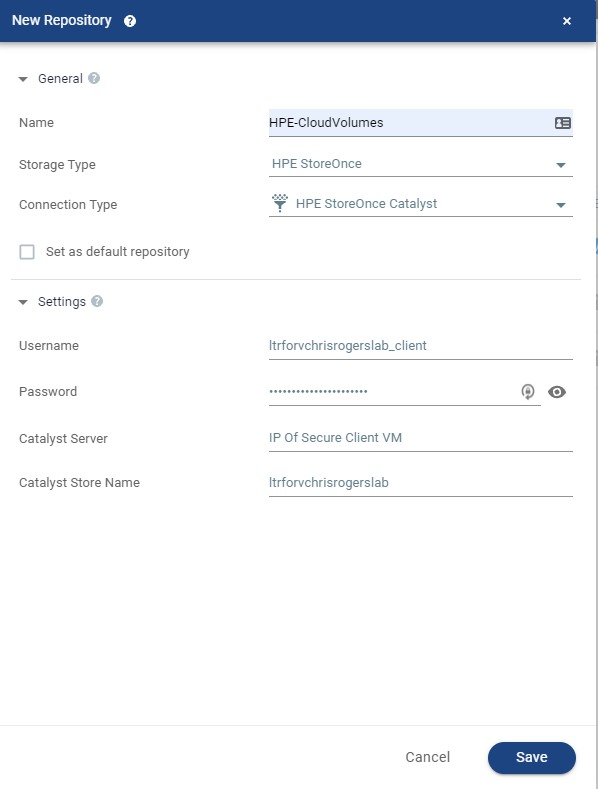
Hi All, today I am going to attempt to set up HPE Cloud Volumes as a repo for Zerto to store its Long Term Retention data. this is something completely new to me so hopefully we can all learn something on the way.
so let’s look at the steps needed to create the backup store and connect it to Zerto.
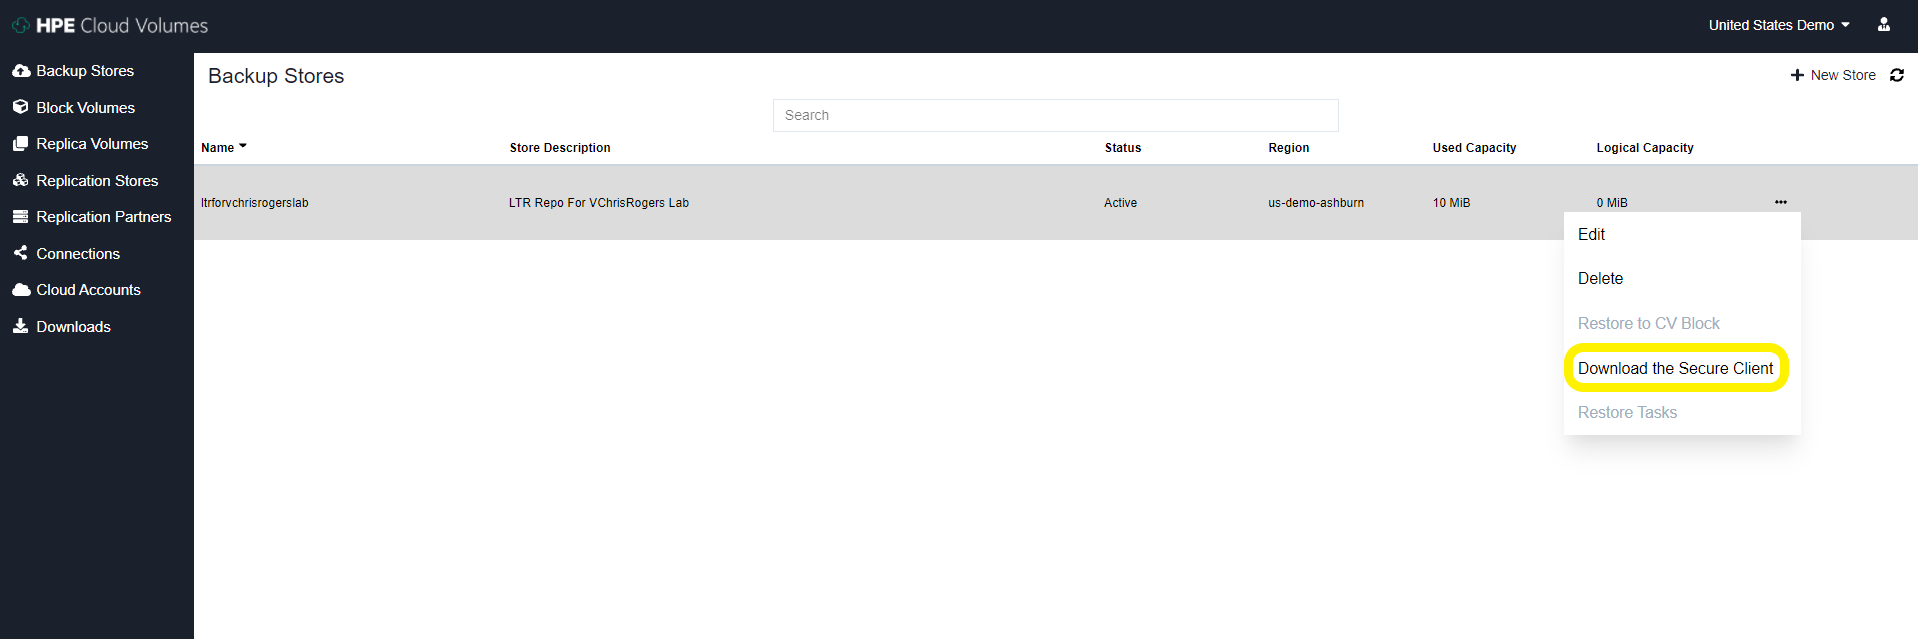
Create backup store inside HPE Cloud Volumes
2. download the secure client from the options tab on the store we just created
I deployed an Ubuntu 20 VM and with my rather limited Linux skills I did manage to configure the secure client service correctly and get it running.
I did have a couple of issues along the way, most likely the issue stemmed from me not reading things properly (I think we have all been there) issues I had are: In the secure_client_config.yaml file I had to change the paths to absolute paths for the files and i have to change the ownership of the files to the user i was running thes service as, again probably just my poor linux knowledge shining through
# Certificate path for CDS signing authority
ca: /opt/cloudvolumes/ca.crt

# Client certificate issued by CDS to customer
cert: /opt/cloudvolumes/client.crt

# Client key issued by CDS to customer
key: /opt/cloudvolumes/client.key

# CBS public endpoint address
target1: demo-us-ashburn-1.cloudvolumes.hpe.com:9387
target2: demo-us-ashburn-1.cloudvolumes.hpe.com:9388

# Local ports to listen upon
source1: 0.0.0.0:9387
source2: 0.0.0.0:9388
4. Once this service has started and all look good inside the VM you can now add the Repo to Zerto in the exact same way that you would add a HPE Catalyst Store from a StoreOnce Appliance – The credentials used are the ones you downloaded from the HPE Cloud Volumes page earlier on.
5. Once this is added you will see it appear as a Catalyst store inside the Zerto UI and now this is enabled for Zerto to store LTR copies on
Now all we have to do is configure a VPG to utilise LTR and send some snapshot free backups to the cloud!
I know this wasn’t particularly in depth but honestly it’s super easy to configure as are most things within Zerto.
This is a great use case for getting your data offsite but not having to pay egress charges etc – another way Zerto and HPE work amazingly well together.
I just wanted to run people by what I am using for my Long Term Retention Repo in my home lab.
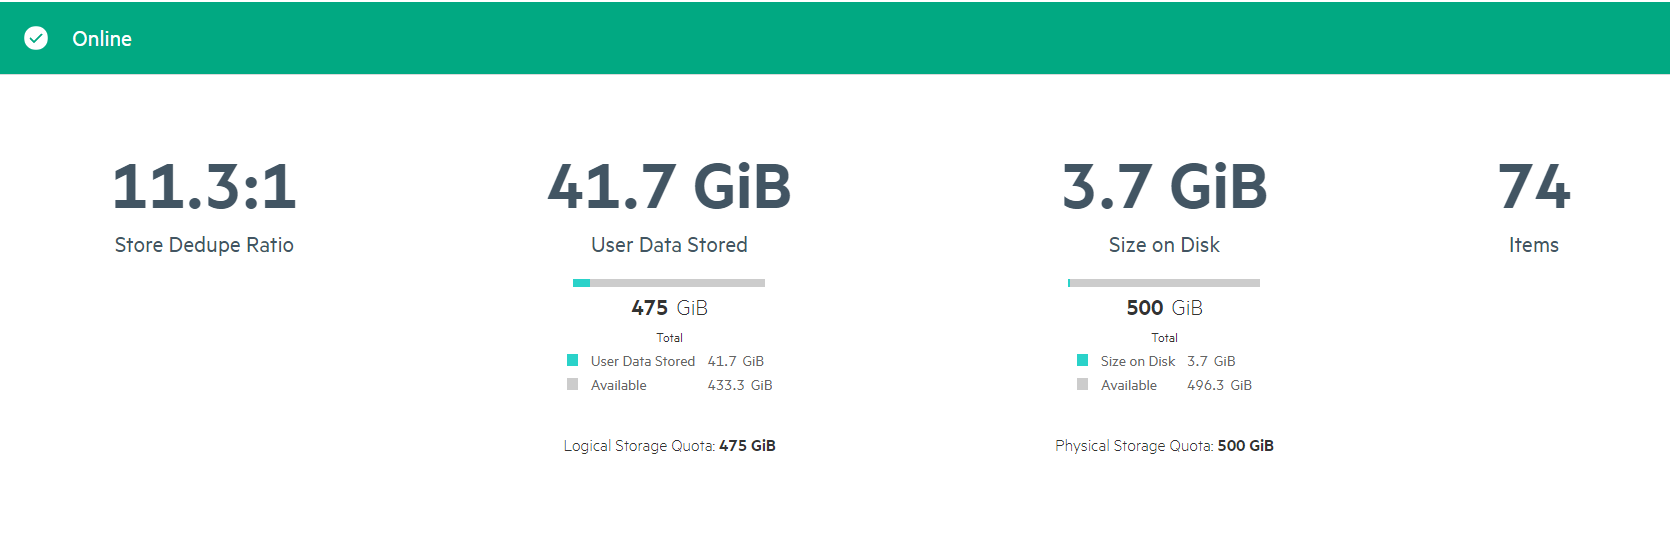
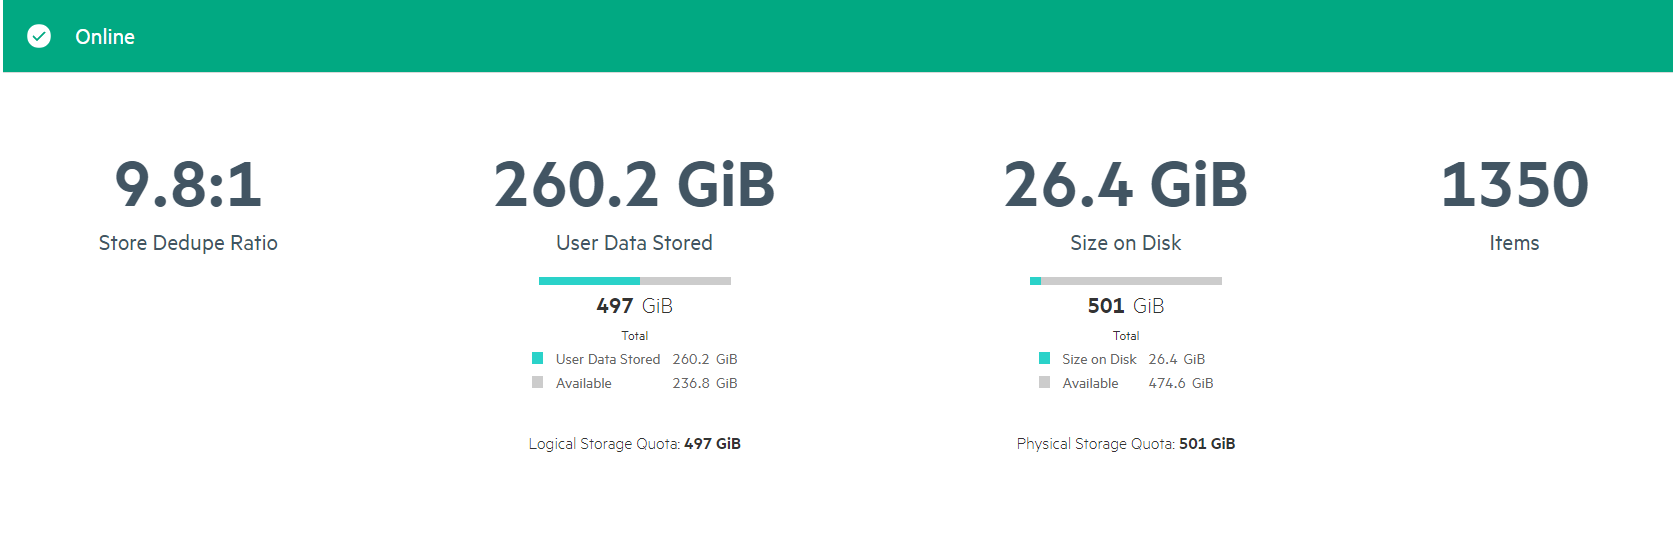
I am using the HPE StoreOnce Virtual Appliance to store my long term retention copies from Zerto on – simply this is a an OVF appliance that i’ve deployed into my environment and have attached some local disks to for capacity – ive got around 1TB of usable space to consume.
the reason why I chose this appliance instead of a Generic NFS/SMB or S3 compatible is that Zerto has tight integration with HPE Catalyst API, this actually runs inside of each and every VRA Zerto deploys. So what does this mean, well…
We can add Catalyst Stores natively from the Zerto UI
Zerto will change the data structure of its LTR Copies to make sure its is perfectly suited to HPE Catalyst Store
Source Side Deduplication via the Catalyst API
Automatically optimize multiple streams without overloading StoreOnce
Automatically manage the repository lifecycle and perform garbage collection
I also think the COmpression ratios i am getting are pretty awesome too! So not am I only saving bandwidth across the network by deduping the data before it’s sent but when it lands im getting decent compression ratios aswell to make sure my LTR copies take up as little space as possible.
I have also created a CIFS share for LTR indexing so all my data is on a single appliance and super easy to use as well to.
So i’ve started my journey into the world of containers and have found loads of resources available to help me understand the concepts.
Obviously I have been taking a look at Zerto for Kubernetes (Z4K), i’ve been reading documentation and watching videos and presentations and gained loads of knowledge from these resources. The one thing that has helped me the most is taking the Hands On Lab for Z4K – And not just once i’ve been doing this repeatedly to get a grasp on CDP for containers but also other kubernetes tasks/tools things like speeding up on creating YAML files from scratch and using Kustomize.
I’d highly recommend anyone who is looking at Zerto for Kubernetes or wants to get a feel about how data protection can work inside of Kubernetes Environments to deploy a lab – Better yet is completely free to do so!
There is also loads of other labs you can try out for yourself, another personal favourite of mine is the Recovery from Ransomware Lab, which actually infects the lab with ransomware so you can recover the environment using Zerto.
I hope you have all read my ZLS deployment guide blog and found it useful in deploying your own ZLS into your environments. I thought I would do a follow up on a few things I have noticed now I have it imbedded in my setup.
ZLS seems to be relatively set and forget – unless you need to divide up licence keys you can pretty much forget it exists.
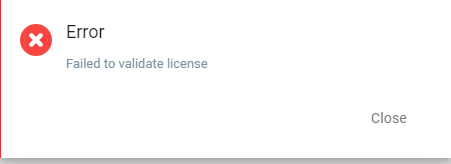
Ensure connectivity remains between ZLS and each ZVM Connected to it! If the ZLS does become disconnected from the ZVM’s then you will not be able to add new VPG’s to your environment
Once the ZLS becomes disconnected you will see the below error on your ZVM
Once you then try and run through the VPG Setup as you try and finalise the settings you will see this error:
Until you resolve the issue with the ZLS and ZVM communication you will be unable to create new VPG’s
All recovery functionality remains available so no impact to ongoing protection or the ability to recover any data either from the journal or LTR repositories.
I was playing around with the new Zerto Licence Server recently and have deployed it into my lab at home,
I then thought, maybe other folks would find it useful to have a walkthrough guide as this is a new component to the Zerto stack… So here it is:
ZLS Overview
Firstly what is the ZLS – well as you can guess its to do with licencing… yes i know the worst subject ever, but important nonetheless. The newly introduced License Server delivers enterprise license automation, self service and reporting to streamline Zerto software licensing.
ZLS Deployment
Download Appliance
As with all Zerto products and packages these are downloaded from the MyZerto portal. once logged in navigate to the “Support and Downloads Page” and download the ZLS package. the great thing about the ZLS is that it gets deployed via an OVF Appliance rather than just install packages, this makes deploying it super simple inside of a VMware Environment.
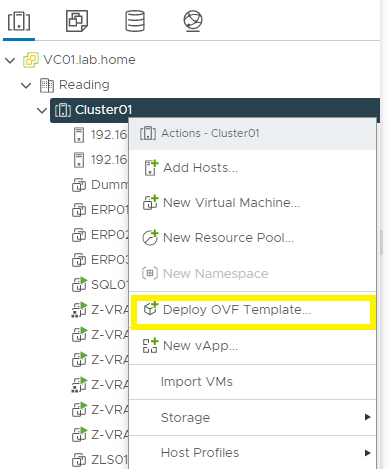
Deploy OVF Appliance
As i’m sure most of you are familiar with deploying an OVF Appliance i won’t spend too much time on this as its a pretty standard deployment
1- Navigate to vCenter to deploy OVF Appliance
2- Continue Through the Wizard to select the relevant files for upload
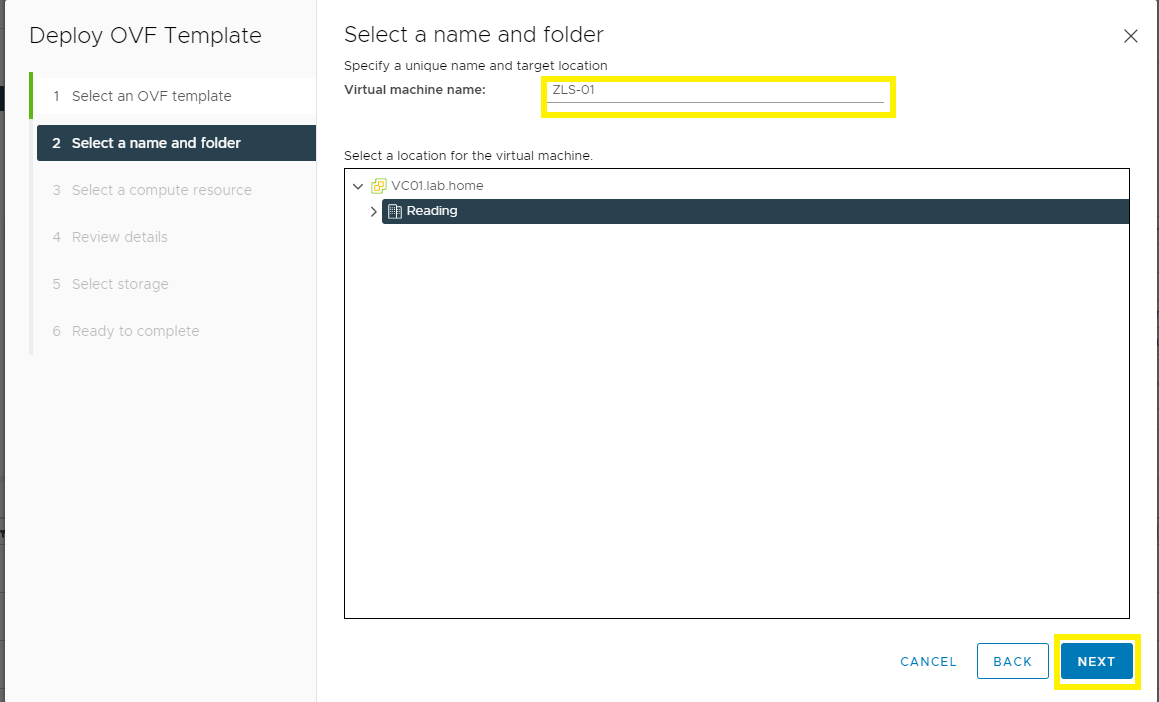
3- Name the VM and Select the location of the VM
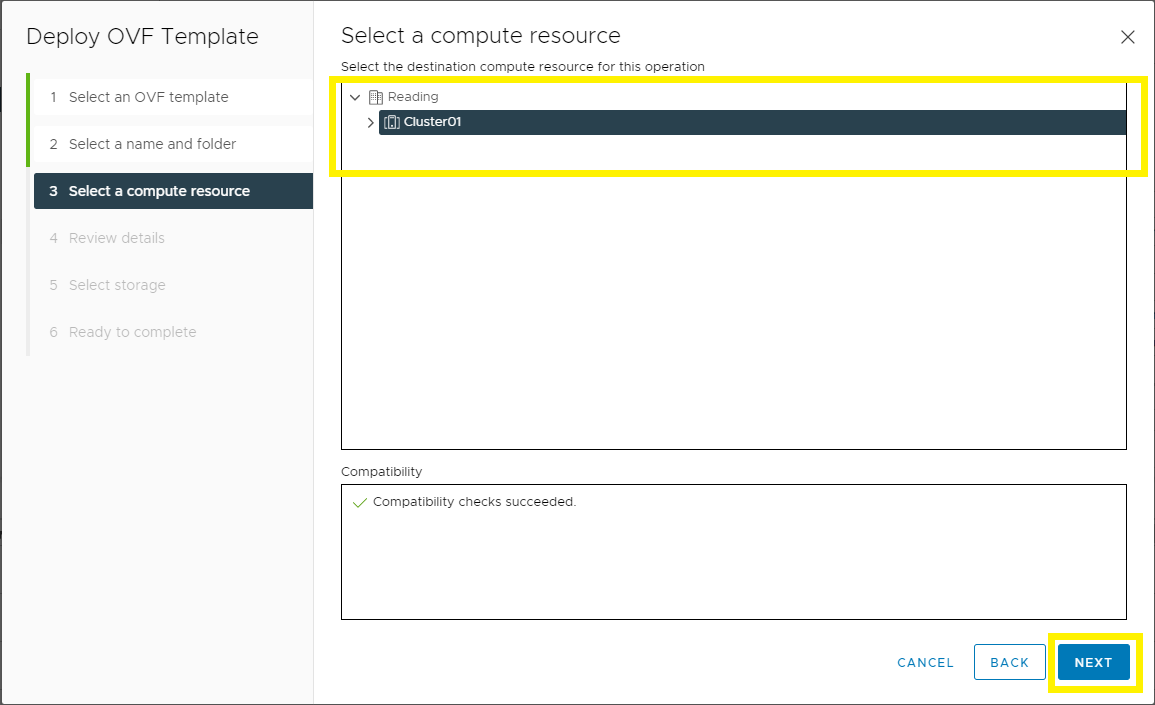
4- Select Compute Resources needed to run the VM
5- select the Storage where the VM will be located
6- Select the Network for the VM to be attached to
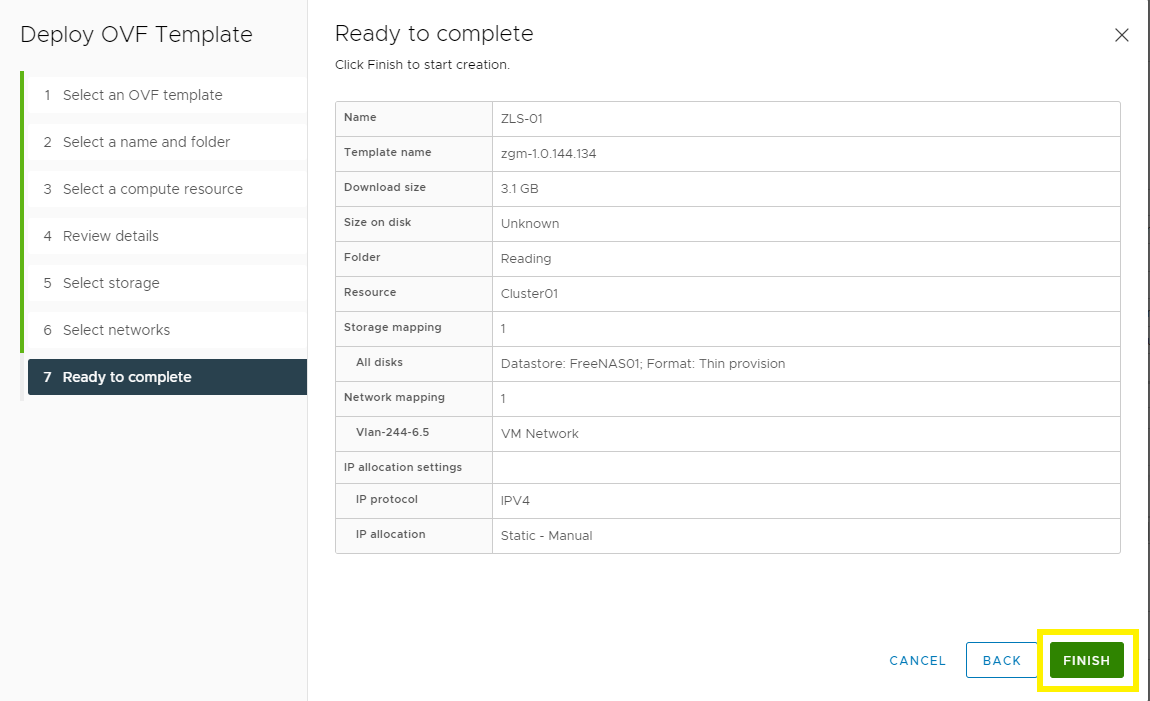
7- Finish and Deploy
ZLS Initial Configuration
Now the ZLS appliance has been deployed, we can start the configuration F
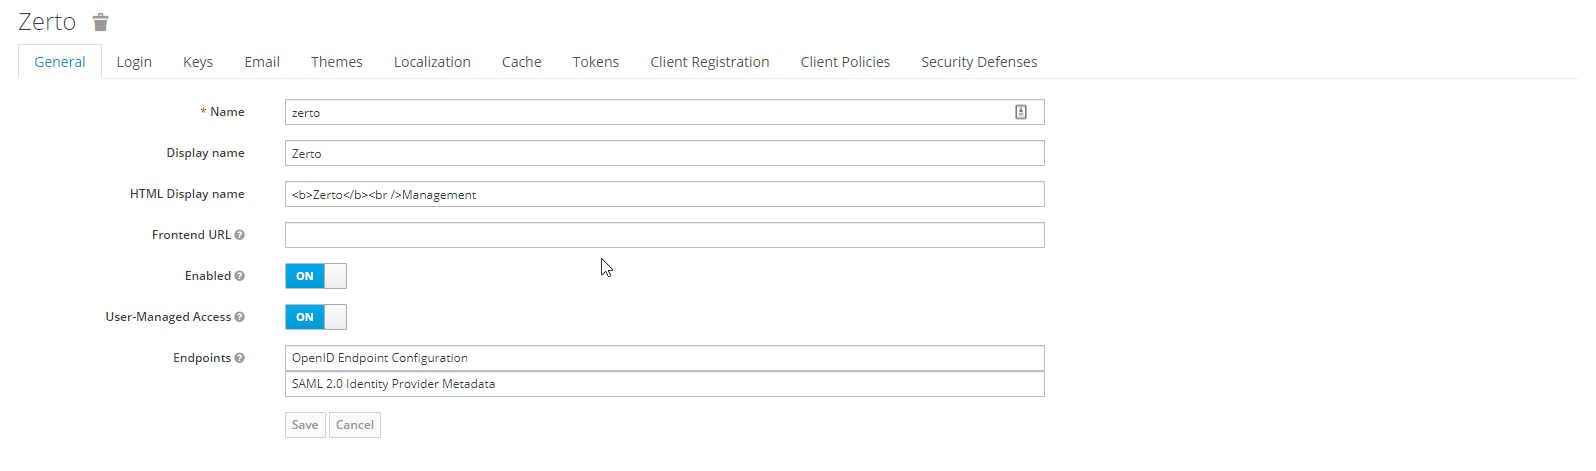
Firstly open the ZLS backend UI which is based upon KeyCloak – this is access via :
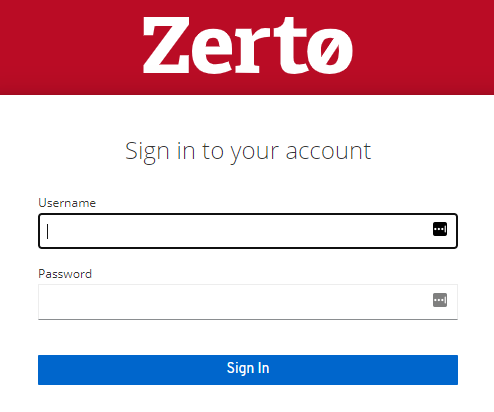
This will open the KeyCloak login page, first login credentials are:
Username: admin
PW: admin
NOTE: you will be prompted to change the password upon first login.
Consider disabling the admin user and setting up your own accounts for security purposes – in my demo i have set up zls-user as a profile.
Keycloak has a wealth of other user management methods including AD integration etc, I will be looking into these at a later date.
Once this has been done you will need to generate an Initial Access Token – this is used to pair a ZVM to a ZLS – I have configured the token to last 1 day as i intend to use it straight away
Keep a note of the Token as we will need it later on and you cant get it back once you close the window
You will need to create a new token for each ZVM connection to the ZLS
ZLS Connection to Zerto Back Office
Now we have our initial setup sorted we will now need to login to the ZLS itself – to do this we just need to access:
This will open up the ZLS portal where you can login using the account you have created.
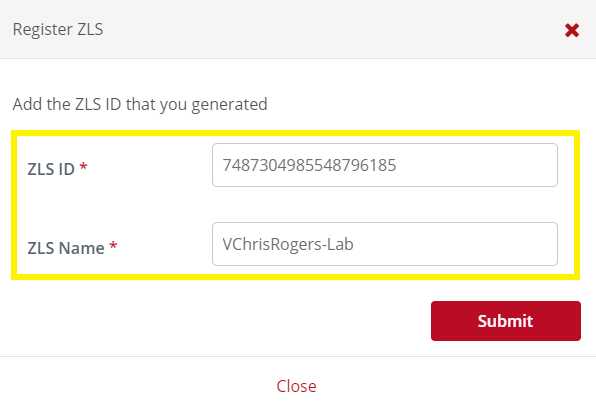
Now logged in you will need to gather the Server ID, this is achieved by selecting the Server ID Button.
Once we have this we need to go back to MyZerto and in the support and downloads section we will find a ZLS section. open this section and the first part we need is to “Register ZLS” this is where we will need the Server ID and we will be required to name the ZLS
Connect ZVM to ZLS
Now we have connected the ZLS to the Zerto Back Office we will now run through connecting a ZVM to a ZLS
Please note if you have already deployed a ZVM this process CANNOT be reversed!
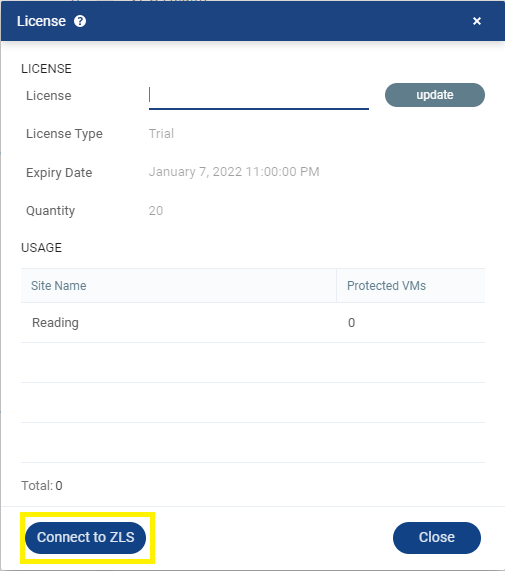
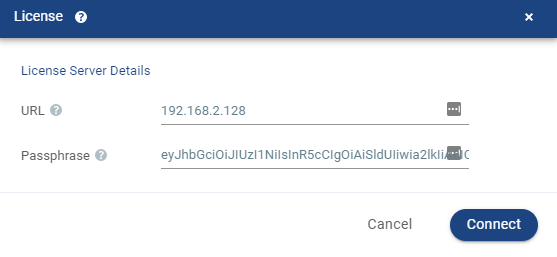
Log into your ZVM and navigate to the menu in the top right, select the “Licence” Option and select connect to ZLS
Now you will need to enter the URL for the ZLS and the token we created earlier
Create Licence Key
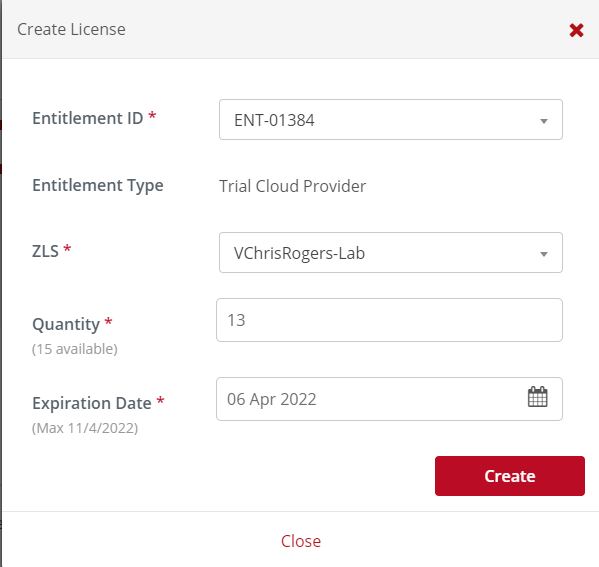
So now we are back to the MyZerto Portal in the ZLS Section, we click the big button titled “+Licence”
This will now bring up a new window asking you for some criteria =:
1- Entitlement ID – will be a drop down from your existing entitlements
2- ZLS – which ZLS you want to register this Licence key to
3- Quantity – Number of VM’s you want this Licence to be for.
4- Expiration date – expiry of licence upto the maximum date of your entitlement
This will now allow you to copy the licence key to your ZLS
your connected ZVM’s will now consume its licence through the ZLS, and will no longer be able to input a standalone licence key into a the ZVM
Well that’s all for this post! i hope you found it useful, feel free to comment and share!